Monday, May 31, 2010

Trilogy of Random Recipes


I bake a lot of muffins. On our days off, the five year old and I bake yummy afternoon teas for the other kids to inhale when they get home from school. And muffins is what we always fall back on when there is no inspiration and even less moolah. Here is why:

1. They are really easy to make.
2. They are quick to mix; no appliances are needed and bake so fast- they only take twenty or so minutes to bake.
3. We ALWAYS have the basic ingredients just sitting in the pantry begging to be used, and then you can just chuck in whatever else you want to fancy your muffins up.
4. They don't contain nearly as much sugar or butter as cookies or cake.

I pretty much have my 4 regular muffin variations: banana-choc chip; cinnamon; cinnamon streusel; and jam centers. Bit boring, but it pleases the masses.
My heart jumped when I saw a recipe for 'Brown Sugar Muffins' yesterday. Hot Diggity! What more could one desire with a mug of chai!
So today, one day from payday, with nary a dollar to my name- it was a perfect time to try this baby out.
I only did 2 things different; no 3! I doubled the recipe, I omitted the nuts AND I added a dash of cinnamon. Cinnamon and brown sugar are friends....

Brown Sugar Muffins (fromTaste and Tell)

Makes 16 muffins
1/2 cup butter, melted
1 cup brown sugar
1 egg1 cup milk
1 teaspoon vanilla
2 cups flour
1 teaspoon baking soda
1/4 teaspoon salt
1/4 cup nuts, chopped coarsely

Preheat oven to 375F. Grease or line 16 muffin cups.Combine all ingredients until mixed. Fill prepared muffin cups and bake for 20 minutes or until done.

I loved these muffins. In fact for the sake of research I 'had' to eat a chunk rather than my usual crumb..... scrump-diddly-licious! It looked like a wholemeal muffin, which I guess must give it some extra 'health status' cred. This may be why the middle two said it was only 'ok......' and they would have' liked something sweeter'. On the other hand the oldest ate 5 without drawing breath and then declared them to the best thing' I have ever made (though THIS statement by THIS child this has to come with THIS disclaimer: He says that about pretty much everything I plate up for him, bless his heart.

The Five year old loved his muffin too which is actually saying something.
Only real change I would do? I would have sprinkled raw sugar on top before baking them if I'd had any; I like that rustic look.


Next recipe! The Five Year old has found a YouTube video of a young girl baking Anzac Biscuits. I get in a heap of trouble from the father-in-law because I am forever calling them Anzac Cookies, which is apparantly highly un-Australian. :)

Anzac Biscuits are extremely Australian. The Anzacs were the Australian and New Zealand Army Corps, and these were the biscuits that worried mothers and wives traditionally sent their men during World War 1. So a lot of sentimental value and history to these. Anyways, the Five Year Old watches this Anzac biscuit making video a lot and he has been longing to make these cookies. So on Saturday, it happened.


After pre-reading an Anzac Biscuit recipe, I was horrified to discover that I have actually never ever made Anzacs. Never. Not once. That is pretty nearly like never having sung Waltzing Mathilda for us Aussies!
I have made oatmeal cookies a plenty, but Anzacs are different.

They have no eggs for one thing! Who knew? And they are such a fun recipe to make with kids because a totally cool scientific process takes place in the middle. Check the recipe out here! Or watch the video, making it as you go, like the 5 year old made me do......took ages with all the pausing to carry out her instructions! But so yummy!

Anzac Biscuits (from Taste.com)


Ingredients :
1 cup (150g) plain flour
1 cup (90g) rolled oats
1 cup (85g) desiccated coconut
3/4 cup (155g) brown sugar
125g butter
2 tbs golden syrup
1 tsp bicarbonate of soda

Method
Preheat the oven to 160°C.

Line two baking trays with non-stick baking paper.

Sift the flour into a large bowl.

Stir in the oats, coconut and brown sugar.
Put the butter, golden syrup and 2 tbs water in a small saucepan. Stir over a medium heat until melted. Stir in the bicarbonate of soda.
Pour the butter mixture into the flour mixture and stir until combined.
Roll level tablespoons of mixture into balls.
Place on the trays, about 5cm apart.
Press with a fork to flatten slightly.

Bake for 10 minutes or until golden brown.
Set aside on the trays for 5 minutes, then transfer to a wire rack so it cools completely.


Last for today, I want to share my favourite chicken fajita recipe. I make it every time visitors come over for Tex-Mexican (alongside a regular burrito buffet and home-made guacomole and salsa, and arroz con frijole negroes.....) Of course when I serve Tex-Mexican and it is just us, we only have tortillas with mince, cheese and salad. What? The preamble to my blog informs you that I am a lazy cook!


This dish has a lovely sweet, yet sour and salty tang. So very moreish. This Sunday, Tracey and I were rostered on Night Church Dinner together so we decided to do a Mexican theme. I made my chicken fajita recipe BUT I won't ever make it the night before again.
It needs to be made fjust a little before you eat it and served up fresh. Reheated chiken has a nasty taste to it I discovered. *shudder*

Chicken for Fajitas (from Jessie Gather)


marinade:

juice from 3-4 limes
8 T olive oil6 cloves garlic,minced
2 T worcestershire sauce
1 T brown sugar
jalapeno (optional. i don't use it), minced
huge handful cilantro, rinsed and minced
1 T saltpepper

2 pounds chicken breasts or tenderloins, pounded to uniform thickness if you care to
1 large onion (vidalia or red is good), sliced thinly into rings
2 red peppers,
2 yellow peppers, sliced

in bowl, mix up the marinade. take out half, and divide the half you reserve into two large bowls. put the chicken in the other half of the marinade and let sit for 20 min or so. When you cook the chicken, throw this used marinade out. Drizzle a few extra tablespoons of olive oil over the onions and peppers.

Turn on your grill. let it get good and hot. spray a cookie sheet with oil, place the veggies on it and grill them until they are limp and carmelizing.
(This last time I actually panfried my onions, they were fine! You might have to do this in 2 batches, since if you crowd them in, they cook much slower. When the veggies are done, put them in one of the bowls with the reserved marinade. stir it around. Let it soak in.

Cook the chicken, 3-4 minutes per side. When done, slice into strips and put them into the other bowl with the reserved marinade. Stir it around. Serve in your favourite Tex-Mexican way!

Thursday, May 27, 2010

Fekerte's Ethiopian Cuisine

Last night the Hairless Wonder and I went to my Happy Place. And I was so very HAPPY.
If there wasn't a mortgage and the education of 4 children in the equation....I would pretty much live at Fekerte's. Her food is THAT good. As it is I only get to go there maybe 4 times a year,( ALWAYS for my birthday) interspersed with visits to her stall at the Bus Depot Markets to get my fix.

When I first met Ferkerte she didn't have the restaurant. It was 1994, we had just moved to Canberra, and I discovered her like an oasis (in a desert of no African cuisine of any sort) at the Bus Depot Markets.

Fekerte also very kindly catered my sister Robyn's 21st with a scrumptious buffet.

Well, life chugged along; we moved away for 14 years, and when came back in 2008, I was concerned that Fekerte would be gone. But no! She is in Dickson, and has grown Ferkerte's into a thriving restaurant, serving up a fresh twist on traditional Ethiopian deliciousness at least 4 days a week. And I have to mention that she recognized me after all that time too!

Let me explain Ethiopian food to you in case you have been living under a culinary rock.

There are a wide range of stews flavoured with a magical blend of Ethiopian spices (most stew are either a 'wat' which is rich and spicy, or a mild alicha which is subtle yet superbly spiced).

Then there is 'enjera', the sublime bread which undergirds every Ethiopian dinner. Describing enjera is a little like describing a platypus.
Enjera are soft and pliabe like an enormous pancake, spongy and porous like a crumpet; and have a tang like sourdough bread. They are large enough to cover a platter. Traditionally they are laid over a communal platter and various wats and alichas are plopped all over. With your right hand you tear off a piece of enjera and use it to scoop up your stew. Oh my! And don't forget to eat all the soaked up bits where the stews were resting. My 5 year old specifically requested enjera for his birthday. All the kids love it and rate it as a favourite food. (hence we did not tell them where we were going last night)
Ethiopian cuisine tastes all the better because you don't have the metalic taste from a fork in your mouth.
I have tried several times to replicate both the stews and the enjera....without success. I can make yummy stews, but they don't taste like Ethiopian stews. And on several brave occasions I have tried to make enjera; the results were disastrous and the house stunk for days, as there is a fermentation process, which I obviously get wrong.

Ok, to the meal!

The Hairless Wonder was inexcusably late, so I went ahead and ordered for the two of us.

We feasted on:

Meat Samosas. $7.90 for two. These parcels of spiced mince and shallots are fragrant and only a little 'burny' as my kids describe anything with chilli. They came with a green dipping sauce which I think was a blend of shallots, coriander, chilli and oil. Divine!
And Cauliflour Fritters. $8.90 for three. I could eat these all day. Cauliflour finely diced, fresh herbs and chickpea flour....deepfried.....sweet mother! It was accompanied by a delicate yoghurt dipping sauce.


For the main we got our usual. I highly recommend the Traditional Platters at $29.90 for 2 people. The platter offer a range of dishes served traditionally on a platter for 2 to share. There are 3 options in this range. One highlights a famous beef wat, the second a reknowned chicken wat and the third option is a combo of vegetarian dishes.
We went for the 2nd option, as usual! My favourite of all Fekerte's is her speciality as far as I am concerned and I have never tasted it quite like hers in any other Ethiopian restaurant. Her Lega Tibs which has wine-soaked chunks of lamb fried with onions and rosemary. So yummy, and a generous serve of it comes with the Traditional platter options.

Let it be known, I got served the best Lemon Lime and Bitters I have ever had last night. The whole dinner was impeccable, and the restaurant was chock full and had all the staff working hard.
We never usually have dessert or Ethiopian coffee but we did last night for the sake of 'research'.
I went for the Semolina Cake in Cinnamon Syrup ($8.90) served with crushed pistachio garnish and icecream. It was so dense, and that more-ish semolina taste enhanced by the sweet cinnamon enticed me into devouring the whole thing! Me! Non-sugar girl! Arggghhh!
H-W was sick and had nothing, which let the team down a little I thought, as I had been keen to taste and photograph the Mamusha. Oh well, next time.


The coffee ($3) is an organic Ethiopian blend; pan roasted, ground and brewed. It was served in a tiny cup and packed a punch. Delicious but I should not have had one so late, when I barely ever drink coffee. I kept waking up all night!!!!

Go and check out my Happy Place if you are in the ACT! Better yet, take me along to 'guide' you through the menu. It would be my pleasure.


I leave you with the image of a previous dinner. Mmm!

Monday, May 24, 2010

Pork Roast Sandwich


A couple years ago when I still watched Oprah sporadically, probably my favourite episode was when her best friend Gayle scoured the land for America's Best Sandwich. She sourced such a variety of sandwiches from restaurants spread across the wallet-draining spectrum.

A really good sandwich is something to celebrate. I still remember my first BLT, made by my friend Andrea Pollard's mother on her birthday. And how it always made my day to open my paper bag lunch at school and find a hamburger sandwich with ketchup. Mmm Mmm! Then there was my 'dainty sandwich' phase with thinly sliced cumber and pepper. And Aunty Anne (not a 'real' Aunty) introduced me to the stinky-breath combo that probably was my childhood favourite: raw onion and mayo.

Oh man, I could go on and on about pleasant sandwich encounters, but I will desist.

Back to Oprah and HER Sandwiches. I cannot recall if it was the same America's Best Sandwich show or a follow-up the next day, but Oprah featured a Sandwich Showdown where 3 chefs each had a viewer assist them in a sandwich-making competition. Our very own Aussie Curtis Stone was one of the chefs; sadly he did not win.

The winning sandwich was chef Tyler Florence's Ron-Trey (named for her husband and son) Entrée Pork Roast Sandwich. And what the judge said about this sandwich stayed stuck in my mind... 'the blue team did what every perfect sandwich—and, indeed, every dish—should do. It had something tangy, it had something spicy, it had something rich but something sweet and something tart with the cranberries. It was very comforting. It was satisfying."
So THAT there is our secret equation, folks. Thank me later!

I made the Ron-Trey Entrée Pork Roast Sandwich last year for our small group, and everyone went back for seconds; some for thirds.
Today for some reason, with all the kids home sick, I made it again on impulse!

Here is how it goes! (The full recipe without my meanders is down the very bottom. )

This recipe feeds 4 so feel free to double....I do.

All up, you need:


4 large crusty bread rolls
4 slices Taleggio cheese (It is a mild semi soft cheese. I couldn't find it, so I used Havarti; Google a suitable substitute if you don't have it on hand!)
1 clove garlic
1 pound boneless pork shoulder (I used an approx 2.5 kg pork shoulder roast)
Kosher salt and freshly ground black pepper
Extra-virgin olive oil
1 bay leaf
1/2 sliced onion
4 sprigs of thyme
1/2 cup hard apple cider
1/2 cup apple juice
2 Tbsp. balsamic vinegar


For the Cranberry-Onion Jam
1/2 onion , sliced
3 Tbsp. dried cranberries
2 sprigs thyme
3 Tbsp. balsamic vinegar
3 Tbsp. apple juice
Extra-virgin olive oil
Kosher salt
Freshly ground black pepper


For the Sweet Potato Chips Fried with Garlic and Sage
1 head of garlic
1 bunch of sage
2 large sweet potatoes
2 quarts vegetable oil for deep frying
Sea salt


Begin with the shoulder of pork. You are supposed to cut the roast into 1-inch-thick slices and tie with kitchen twine into circular shapes. For some reason I didn't read this nugget of information!!!! Hence I worked with a massive slab of pork. You are also supposed to cook the pork in a pressure cooker. Who has a pressure cooker these days? My Mom used to, I guess back in the 80's. I don't have one, so I put the pork shoulder in my trusty slow cooker. You need to let a slab the size I used, slow cook for at least 7 hours so it is fall-apart tender. I cut out the browning stage of the recipe, simply threw in all the ingredients (up to the balsmic vinegar) and turned that baby on!


Much later, with the rich aroma of cider-soaked pork assailing our nostrils, we made
Cranberry-Onion Jam.

Chopped up the onion and cranberies.
Caramelized the onions in oil.
Added the cranberries and sage. Added the wet ingredients, brought to a boil and then simmered on a lower heat at least 10 minutes till the sauce thickened and the elements were really soft. I added extra apple juice and reduced the jam two more times, and it was still nice and tart.


Next the chips. 
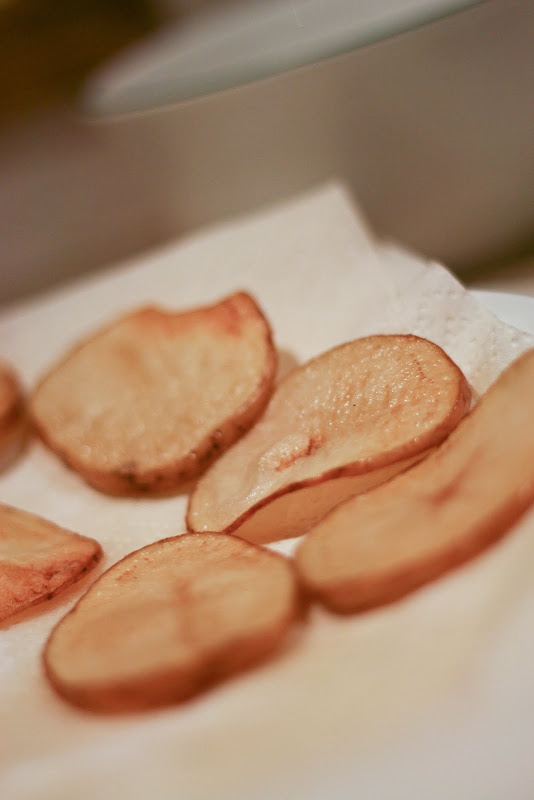
I did not slice the chips thinly (as you can see above), nor did I use sweet potato. I sliced up regular potatoes sideways. I was also a little skeptical of the sage and garlic infused oil actually working.
But it did! I chucked the head of garlic and the bunch of sage into the saucepan of oil. Heated it on high until the sage started to really cook, and then removed them both. And the oil definitely smelt of sage, and maybe a little of garlic.

Solo Girl and I then started slipping the potato slices in and turning them till crisp.

These chips were yummy, but I recommend following the recipe to the T, regarding the thin slicing. Our chips would have had that extra crunch if WE had.


So once all the componenets were ready, it was assembly time.
I sliced the pork up into hamburger-sized chunks seeing as I hadn't read the recipe......

We cut open the buns, rubbed garlic on the bottom inside of each and laid slices of cheese on the top inside. Under the grill they went till crisp and the cheese was melted.

Added a hunk of pork on each bun, topped with the cranberry-onion jam, followed by the cheese-laden bun lid. Adorned each plate with the chips. Feast!!!


Solo Girl plated artistically.


Full recipe directions to follow after the PS!

PS: They may have taken nearly a whole hour to make, not including baking time, (learning to go through the process of reading and carrying out a recipe by yourself can take time) but Solo Girl's banana chocolate chip muffins were certainly worth the wait. They were truly sweet enough to be cupcakes I think.


Ron-Trey Entrée Pork Roast Sandwich

Directions: Begin with the pot roast. Cut into 1-inch-thick slices and tie with kitchen twine into circular shapes. Season the pork in hot oil in the base of a pressure cooker. Add the onion, bay leaf and thyme. Brown for 1 minute, then add juice, cider and balsamic. Cover with lid, lock it and pressure cook for 20 minutes until tender.Cut buns in half. Lay slices of cheese on the top halves and brown under the broiler until crispy and cheese has melted. Toast the bottom halves, then rub with a garlic clove.To assemble, lay a slice of the pot roast on the base. Top with Cranberry-Onion Jam and garnish with a fried sage leaf.


Directions For the Cranberry-Onion Jam

Heat a sauté pan over medium heat and add a 2-count of olive oil. Add onions and caramelize—about 4 to 5 minutes. Add cranberries, then thyme and balsamic and juice. Simmer for 10 minutes until the mixture is creamy and the onions and cranberries have just started to fall apart. Season with salt and pepper.

Directions For the Sweet Potato Chips Fried with Garlic and Sage

Take a large pot and set over medium heat. Add garlic and sage and bring the oil up to 375°. As the oil heats up, the sage and garlic will infuse the oil. Remove garlic and sage and set aside. Using a mandolin or vegetable peeler, shave thin chips out of the sweet potato. Rinse in cold water, drain and fry in oil until crispy. Drain and season with sea salt.

Friday, May 21, 2010

Choc Chip Cookie a' la Tweak!


(or as Boy 2 christened them: Boy 2's Miracle Cookies)


Boy 2's sole reason for baking cookies this morning was so he could have cookie dough to scoff. That probably explains why he only baked one tray and left the rest for me to deal with!

He had already trudged down to the local IGA to fetch eggs, choc chips and sugar, so when he discovered halfway in that we were 1/4 cup short of butter, he did not embrace the thought of another shopping venture.
I personally didn't either so I suggested he fill the fat-gap with peanutbutter.

Boy 2 did, and the result left my tastebuds doing the dance of "more please!'
His other tweak I only discovered later: to leave 3/4 of the required choc chips out. We only had 1 cup of chocolate chips in the first place and he kept 1/2 cup out, I am guessing, so he could scoff those on the side. But this allowed the rather subtle peanutbutter flavour to come a little more to the fore.
Below is the original recipe with Boy 2's tweaks in brackets. :)

Original Tollhouse Chocolate Chip Cookies

Ingredients
2 1/4 cups all-purpose flour
1 teaspoon baking soda
1 teaspoon salt
1 cup butter, softened (3/4 cup butter and 1/4 peanutbutter)
3/4 cup granulated sugar
3/4 cup packed brown sugar
1 teaspoon vanilla extract
2 large eggs
2 cups choc chips (1/2 a cup of choc chips)
1 cup chopped nuts (we never put nuts in!!!)

Directions :

PREHEAT oven to 375° F. (190C)
COMBINE flour, baking soda and salt in small bowl.
Beat butter, granulated sugar, brown sugar and vanilla extract in large mixer bowl until creamy. Add eggs, one at a time, beating well after each addition.
Gradually beat in flour mixture.
Stir in morsels and nuts.
Drop by rounded tablespoon onto ungreased baking sheets.
BAKE for 9 to 11 minutes or until golden brown. Cool on baking sheets for 2 minutes; remove to wire racks to cool completely.


Wednesday, May 19, 2010

Materchef's Black Forest Cake (or if you cook it my way: Michelle's Snap Crackle Pop Cake)

(disclaimer-I was superbly bummed that for this cake, I did not have my sweet lens, as it would have compensated for the indoor night-time lighting)

I nearly backed out of doing this Masterchef cake at the last minute. It all looked too hard AND expensive: asking for a ton of fresh cherries which are hard to find this season and so very dear!

How did we come to be creating the Masterchef Black Forest Cake at all? Well its Shannon's fault. The other day I asked our friend Shannon what kind of birthday cake he wanted me to make him for our small group dinner the next week. Of course I expected the usual 'anything chocolate'. But one comes to realized that you should never expect the usual with Shannon. His reply was more along the lines of: 'I have a vision. In this vision there are layers and there is creamy stuff inside.'

Solo Girl and I looked at each other and thought the same thing....the BlackForest Cake from the elimination challenge a couple weeks ago fit the bill entirely! Layers....check. Creamy stuff.....check. And the judges were looking for the satisfying crunch of a wellmade hazelnut praline mousse in a couple of the layers. So I assured Shannon we would bake him a extra special Snap Crackle Pop Cake.

And of course I barely gave it another thought till Monday night when I raced out to get the ingredients. After a cursory read through the recipe, I quickly some mental alterations to the recipe. First was the fresh cherries. Out they went and I instead bought two massive and perfectly respectable jars of cherries.

And after learning the Masterchef chocolate sponge would need a dreaded sugar thermometer, I sat down and Googled 'Easiest Chocolate sponge cake'. Well, wouldn't you?
I made all the components of the cake the night before.


These components were:

*the cakes use THIS recipe if you aren't wanting to do the hard yards!
*the marscapone cream
*the the hazelnut praline mousse
*the cherry glaze
*the candied cherries
*the cherry compote


1. The cakes turned out fantastically, probably not super spongey, but light and delicious. I got ahead of myself and siced them into 5 layers instead of 6 before checking the recipe, which actually required 6 layers...........

2. The marscapone cream was fantastic. I have never used it before. It is like the thickest cream you can imagine. Mixed with a little vanilla bean paste and icing sugar, it tasted divine!

3. The hazelnut praline mousse.....I am so proud of myself for making this. I made the hazelnut praline which was a feat in itself. I still cannot believe that sugar melts when placed dry in a saucepan over low heat. Once it was cooled I processed it till crumbled andthen thought that was it. I didn't read what else was required until a half hour before our visitors came!!!!! The chocolate custard came together perfectly though and the the finished product was to die!!!!!!!

4. The cherry processes. Did I already say that I decided not to put in real cherries? :) Well, after the cherry compote didn't thicken, I decided to combine the 3 cherry processes into one single uncomplicated process. I made a simple yet delicious cherry syrup using equal measurements of the cherry juice and plain sugar ( I had run out of caster sugar by this time!). Brought it to the boil and then let it simmer for a minute. Then I poured that glossy sticky syrup all over the entire amount of cherries (squeezed slightly to rid them of excess juice) required in the recipe.
Below is a collage of the layers as the recipe stated they be made.
You will find the recipe after!


Please make this Black Forest cake at least once in your lifetime. It is EXTREMELY edible, though you will require a small posse to help you get through the whole cake, and ingesting two pieces in rapid succession may make render you unable to stand up straight for a full day. Oh and I actually preferred it after it had been in the fridge overnight, absorbing all the flavours into the cake!

Ingredients:
For the chocolate sponge:
7 eggs
250g caster sugar
200g plain flour
50g cocoa powder
2 tsp baking powder
1 tsp vanilla extract

For the candied cherries:
1/2cup semi-candied pitted cherries, ¼ cup juice reserved
1/4cup caster sugar

For the cherry compote:
1/3 cup caster sugar
600g pitted fresh cherries, halved
1 tbs brandy

For the cherry sugar syrup:
90g caster sugar
¼ cup cherry juice

For the chocolate hazelnut praline mousse:
½ cup caster sugar
½ cup hazelnuts, toasted lightly and skinned
300g chopped dark chocolate
3 egg yolks
300ml thickened cream
1 tsp vanilla extract

For the mascarpone cream:
500g mascarpone
1 tsp vanilla bean paste
2 tbs icing sugar

For the dark chocolate ganache (which is absolutely divine, don't miss this part even if only for the finger-slurping bowl it will provide you afterwards. So good!) :
150ml cream
200g chopped dark chocolate
shaved chocolate
fresh cherries


Method:
1. For the chocolate sponge, preheat oven to 160°C fan forced. Grease and line 2 x 20cm springform cake pans.
2. Add eggs and sugar to a heatproof bowl of an electric mixer, and set over a saucepan of simmering water over very low heat. Whisk the mixture until 37°C. Remove the bowl from the heat and beat with an electric mixer on a medium-low speed for 5-8 minutes or until the mixture has cooled and thickened to a mousse-like consistency. Sift the flour, cocoa powder and baking powder together twice. Using a large metal spoon, fold the dry mixture into the egg mixture in 3 batches until combined, adding the vanilla extract with the first dry batch.
3. Pour the mixture into the lined cake pans and smooth surface. Bake for 20-25 minutes or until sponge springs back when lightly touched. Allow to cool for 10 minutes in the pans, then turn out onto wire racks. Place in the blast chiller for 10-15 minutes until cake has cooled completely.
4. For the candied cherries, preheat oven to 120°C. Place cherries on a lined baking tray. Lightly dust with the sugar and place in the oven for 50-60 minutes. Remove and cool. Coat with remaining sugar. Set aside.
5. For the cherry compote, add the sugar to a non-stick saucepan and place over medium heat. Once the sugar begins to dissolve add the cherries and cook until they start to release their juices. Add the brandy and cook for 10-15 minutes or until the liquid has reduced and thickened. Strain, reserving liquor.
6. For the cherry syrup, heat 170ml water and the sugar in a small saucepan and bring to the boil, stirring constantly. Remove from the heat and stir in the reserved cherry juice and compote liquor. Allow to cool.
7. For the chocolate hazelnut praline mousse, line a baking sheet. In a dry heavy-based saucepan, cook sugar over medium heat, stirring, until melted. Once melted, cook without stirring, swirling pan, until lightly golden. Add hazelnuts, stirring until well coated. Immediately pour mixture onto the baking sheet and cool completely, in blast chiller for 5 minutes. Break praline into pieces. Place into a food processor and pulse until finely chopped. Set aside.
8. Melt the chocolate in a heatproof bowl set over a pan of simmering water. Whisk the egg yolks in a small heatproof bowl. Heat 250ml of the cream in a small saucepan over low heat. Stir through half of the hot cream into the egg yolks. Return the mixture to the saucepan over low heat and stir until thickened. Strain into a clean bowl. Stir the melted chocolate into the hot custard. Add the vanilla and allow to cool. Whisk the remaining cream until stiff peaks form. Fold into the chocolate mixture with the praline, until just combined. Set aside.
9. For the mascarpone cream, beat the mascarpone, vanilla and sugar in a bowl until smooth and slightly thicker in volume.
10. For the chocolate ganache, melt the chocolate in a heatproof bowl set over a pan of simmering water. Set aside. Bring the cream to just below boiling point in a small saucepan. Remove from the heat, then add the melted chocolate and stir until smooth. Allow to cool until thick but still pouring consistency.
11. To assemble the cake, slice both cakes into thirds. Place the base of 1 cake onto a serving plate and brush with some of the cherry syrup. Spread over half of the chocolate praline mousse.
12. Place the next layer of cake onto a board, and brush with cherry syrup. Spread over half of the mascarpone cream. Divide the cherries into two parts for two separate layers. Place cherries around the border of the cake, 5mm from its edge and scatter remaining in the middle. Carefully remove layer from the board and place on top of the first layer. Repeat each layering process on the board (you will have 1 spare slice of cake), starting with the praline mousse and ending with the cherries on the mascarpone cream.
13. Place the final layer of the cake on a wire rack sitting over a baking tray. Evenly pour the ganache over the cake, ensuring it is completely coated. When the ganache has set, place on top of the layered cake. Decorate with shaved chocolate, fresh cherries and candied cherries.


Sunday, May 16, 2010

Celebration of Wool- Kingston Bus Depot Markets


The Bus Depot Markets in Kingston invited Doggy-Bag It to come and check out their Celebration of Wool event on May 16. As I read the accompanying article which touched on Australia's long history with wool, a bucket load of my earliest memories flooded back.
Funnily enough, my strongest childhood images of visits back to Australia have nothing much to do with food(well, let's not not count the McDonald's thick shakes we simply HAD to have the very second we stepped off the plane) .

What lingers in my mind are huge family get-togethers; catching up on four years worth of birthday gifts; trundling along at a snail's pace across our vast land in an old caravan; and the wonderful fun we had staying on farms along the way. There were massive orchards as well as sheep and cattle stations, and maybe a couple of grain farms also. Seeing these farms operate up-close gave rise to a swell of patriotic pride in our farming community and the hard slog they do.

My visit to the wool on Sunday show somehow reawakened that same emotion in me , something that 3 years of city life has dulled.


It always happens ....whenever I see a thing of exquisite beauty, I yearn for the skills to recreate it. So before going to the Celebration of Wool, I steeled myself to be confronted with stunning peices of knitwear and to just appreciate it and celebrate the artists' skills and gifts, with no destructive non-knitter's envy.
Ummm, once I was there it was total steel-mind FAIL. Destructive non-knitter's envy abounded!!!!

The place was packed, let me tell you; seething with people. The weather was perfect for it. My friend Tracey and I were focused on our mission;we only stopped for a pint of apple and lemon juice and that was the only food our bellies saw the entire time. (Oh, do the sample chilli toasted cashews count? They were scrumptious.)

But now, I want to introduce you to a few of the wool artists I met:

JanetteMcGuffog is an acrylic and textile artist who only in the past few months has begun creating wearable art. Imagine what she will be creating in another year!!!! She uses a combination of felt/silk/ merino wool to put her artwork onto scarves. I cannot even begin to imagine the processes Janette uses. Her work is stunning...these photos do not do it justice...


Jane Slicer Smith's swing coats, cardigans and sweaters hung in a rich range of colors. Her label is Signatur Handknits. Jane has an eye for brilliant color combinations. She sells a large range of customized knitting kits, and her book Swing Swagger Drape-Knit the Colors of Australia is just out and you can order it online.


adele designs displayed unusual scarves, bold chunks of color in hues that made me all of a sudden want a great steaming mug of hot chocolate (always with the food thoughts!!!). The scarves are created entirely from recycled wool and silk. A percentage of all proceeds goes to breast cancer research. Five minutes with Adele left me moved and inspired. She is currently fighting her own battle with breast cancer and though there are some grim days, her gifts and her beautiful spirit shine as bright as her smile.


The bold colors and varied textures of Gill's hand-dyed yarns lured us in. Such delicious colors.....looked like a candy shop!


The Spinners and Weavers group meet regularly for social spinning and weaving days. Jenny related how 35 years ago she started spinning using coarse wool straight from the sheep's back. She still can't get over how much easier it was when 3 years ago she began to spin silk/cashmere. 'Its like spinning fairy floss,' she reckons.


Claire Patterson has some stunning garments and was extremely busy while we were in her space. She is based in Sydney.


I was blown away by Kathy Geurts' handcrafted jewellery ( Wool? As jewellery? Oh yes!! just look) and objets d'art. What kind of mind comes up with woolen jewellery? We hung around her place for ages at her stall; we even ran the shop for 5 while she ducked out for a coffee! :)


It was a great morning, I really wanted to include pictures of everyone, but there were just so many amazing stalls. Next time I will be much more organized ahead of time, so that I don't accidentally leave my WALLET at home!!!